Update 04 Jan 2018
Troubleshoot problems with the Start menu Win 10
Windows: The Start Menu in Windows 10 is useful, but it’s not perfect. Sometimes tiles go missing, or it won’t open at all when you click it or press the Windows key. Other times the tiles don’t refresh, or Cortana doesn’t respond. Thankfully, Microsoft’s Start Menu Repair Tool is here to help, and it’s free: startmenu.diagcab
After downloading, you can just doubleclick on the file and it will start the troubleshooter.
In my case it corrected the tiles database
+++
You notice your start menu button is no longer responding
When you decide to do a restart or sign out you get:
Task Host Window
microsoft\windows\plug and play\device install reboot required
there is a temporary solution: log out as user, kill the Task host windows and log in again. Startmenu works again !
source
donderdag 2 november 2017
dinsdag 24 januari 2017
ASRock BIOS "Secure Flash check Fail" solved
Q1900TM-ITX
I wanted to upgrade the firmware from the existing 1.20 to 1.50 as offered by Asrock from their website.
I am running this board with 8GB RAM and Win10 Pro x64 and according to Asrock for Win10 users the firmware upgrade preference is to use Instant Flash or Internet Flash in the UEFI setup.
I tried both options and always failed with a popup box stating "Secure Flash Check Fail" message.
Together with asrock support I tried several options to get either Instant Flash or Internet Flash to work.
Both to no avail. Internet flash did not detect internet and always asked to check my internet settings
and instant flash always complained "Secure Flash check Fail"
Solution: all done within Win10
I went to the AMI Megatrends Website to get:
AMIBIOS_and_Aptio_AMI_Firmware_Update_Utility.zip
unpacked the file and went to
\AMI\AMIBIOS_and_Aptio_AMI_Firmware_Update_Utility\amiflash\Aptio\afuwin\64\afuwin64\AfuWin64 and started AFUWINGUI.EXE
Flashed Asrock Bios from 1.20 to 1.50 using AMI Megatrends Aptio AFUWINGUI V.3.07.01 x64 with the following setup:
Tick the following boxes:
Program all Blocks
Main BIOS Image
Boot Block
NVRAM
Do not Check ROM ID

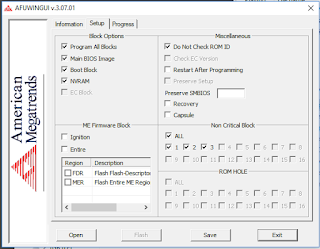

Bios 1.50 downloaded from Asrock site and renamed to Q1900TM150.ROM
After completion, shutdown PC
At next boot goto F2 Bios setup, F9 Load UEFI defaults, F10 Save and reboot again.
After that, get into updated BIOS using F2 and adjust to your liking.
I am running this board with 8GB RAM and Win10 Pro x64 and according to Asrock for Win10 users the firmware upgrade preference is to use Instant Flash or Internet Flash in the UEFI setup.
I tried both options and always failed with a popup box stating "Secure Flash Check Fail" message.
Together with asrock support I tried several options to get either Instant Flash or Internet Flash to work.
Both to no avail. Internet flash did not detect internet and always asked to check my internet settings
and instant flash always complained "Secure Flash check Fail"
Solution: all done within Win10
I went to the AMI Megatrends Website to get:
AMIBIOS_and_Aptio_AMI_Firmware_Update_Utility.zip
unpacked the file and went to
\AMI\AMIBIOS_and_Aptio_AMI_Firmware_Update_Utility\amiflash\Aptio\afuwin\64\afuwin64\AfuWin64 and started AFUWINGUI.EXE
Flashed Asrock Bios from 1.20 to 1.50 using AMI Megatrends Aptio AFUWINGUI V.3.07.01 x64 with the following setup:
Tick the following boxes:
Program all Blocks
Main BIOS Image
Boot Block
NVRAM
Do not Check ROM ID


Bios 1.50 downloaded from Asrock site and renamed to Q1900TM150.ROM
After completion, shutdown PC
At next boot goto F2 Bios setup, F9 Load UEFI defaults, F10 Save and reboot again.
After that, get into updated BIOS using F2 and adjust to your liking.
Hope it helps
dinsdag 20 september 2016
Crucial SSD utility reports
source
My crucial SSD utility reported that I should optimize my SSD performance by disabling 8.3 file name creation on all NTFS partitions.
The use of 8.3 file names and directories for all long file names and directories on NTFS partitions may decrease directory enumeration performance. An 8.3-compliant file name refers to MS-DOS file-naming conventions. These conventions restrict file names to eight characters and optional extensions to three characters.
This article describes a method of disabling 8.3 file name creation on all NTFS partitions.
Note: Although disabling 8.3 file name creation increases file performance under Windows, some applications (16-bit, 32-bit, or 64-bit) may not be able to find files and directories that have long file names.
Windows Vista, Windows Server 2008, Windows 7, Windows Server 2008 R2, Windows 8, and Windows Server 2012
To disable 8.3 name creation on all NTFS partitions, type fsutil.exe behavior set disable8dot3 1 at an elevated command prompt, and then press Enter.This operation takes effect immediately (no restart required).
Notes
When a volume is not specified, the operation updates the registry value:
- 0 - Enable 8dot3 name creation on all volumes on the system
- 1 - Disable 8dot3 name creation on all volumes on the system
- 2 - Set 8dot3 name creation on a per volume basis
- 3 - Disable 8dot3 name creation on all volumes except the system volume
- 0 - Enable 8dot3 name creation on this volume
- 1 - Disable 8dot3 name creation on this volume
For more information about FSUTIL.EXE 8dot3name, see the following TechNet article:

zondag 8 mei 2016
Lubuntu Remote XRDP and VNC blank desktop [Solved]
I installed xrdp and x11vnc on my Lubuntu 16.04LTS box
Trying to access my Lubuntu using XRDP and vnc gave me a blank desktop on my win10x64 desktop (using mstsc.exe for rdp)
I read somewhere to install lxde-common, so i did (apt-get install lxde-common)
And yeah it worked for xrdp (the screen icons are a bit different but I can live with that)
(no tweaking done)
To fix the blank desktop using VNC you have to uncomment 2 lines which are commented by default after installation of x11vnc (below the setting where the 2 lines are uncommented which fixed the blank desktop)
root@ub:~/.vnc# more xstartup
#!/bin/sh
# Uncomment the following two lines for normal desktop:
unset SESSION_MANAGER
exec /etc/X11/xinit/xinitrc
[ -x /etc/vnc/xstartup ] && exec /etc/vnc/xstartup
[ -r $HOME/.Xresources ] && xrdb $HOME/.Xresources
xsetroot -solid grey
vncconfig -iconic &
x-terminal-emulator -geometry 80x24+10+10 -ls -title "$VNCDESKTOP Desktop" &
x-window-manager &
root@ub:~/.vnc#
Strange is that I see some LXDE entries are added in the autostart which I have not done myself:

LUbuntu light-locker-settings didn't start (cannot activate screen dim)
Lubuntu based on Ubuntu 16.04LTS
When I click on Light locker settings it does not show the menu for light-locker and worse I noticed that my screen does not dim at all
In order to make Screen dim work I installed xscreensaver but did not work either: When i clicked on the screensaver icon in /usr/share/applications it said the following:
The XScreenSaver daemon doesn't seem to be running on ":0". Launch it now?
In order to launch it automatically I added xscreensaver -nosplash in
Preferences -> Default Applications for LXSession -> Autostart
Now it is automatically started and after I adjusted the timings for the screensaver it works as intended.
zaterdag 7 mei 2016
Deep sleep mode Nexus 5x and Whatsapp
I noticed that I did not receive whatsapp notifications on my phone while it was in sleep mode.
I'm going to see if disabling deep sleep for Whatsapp solves it.
(source)
I'm going to see if disabling deep sleep for Whatsapp solves it.
(source)
You can turn this off per app. Go to:
Settings > Battery
Touch the menu icon (three dots)
Touch Battery Optimization and touch the down arrow, followed by All apps
Tap on the app that you want to turn off optimization
Select Don't Optimize and touch Done.
zondag 17 april 2016
Patch update April 2016 issue [Solved]
Win7 64 bit fully patched (up to patch update April 2016) got into issues after receiving April update. Windows shutdown unexpectedly and after restart it looked like it came into a boot loop.
One of the things was >50% CPU for svchost and everything else brought the cpu to 100%
I suspected a temperature issue due to the high cpu but I came across an article which solved it.
What I did to resolve it was found in this article:
Set windows update to "Never check ..."
Reboot pc and now CPU load was back to normal
Install KB3145739 manually. Go to Microsoft website to download and then install.
Next you should restart and finally you can check for updates in manual mode.
Doing manual update after KB3145739 install showed 14 updates left
These patches installed fine while watching CPU load en CPU Temp and the pc went installing these patches without a hitch.
Abonneren op:
Posts (Atom)