You can download the latest firmware for the J9802A switch here:
This location offers PL2.08 software version for J9802A (HP 1810-8G switch) but is is not a zip file containing a .img file for upgrading but it is a .gz file containing a .bin file (If you use Chrome)
In other words it is not possible to upgrade from a windows machine.
Note: PL.2.07 does provide a zip file which contains a .img file
Solution:
Do not use Chrome but IE and Voila now from the same location a .img file can be downloaded
Strange but luckily solved by switching browser ..
donderdag 2 november 2017
Win 10 start unresponsive
Update 04 Jan 2018
Troubleshoot problems with the Start menu Win 10
Windows: The Start Menu in Windows 10 is useful, but it’s not perfect. Sometimes tiles go missing, or it won’t open at all when you click it or press the Windows key. Other times the tiles don’t refresh, or Cortana doesn’t respond. Thankfully, Microsoft’s Start Menu Repair Tool is here to help, and it’s free: startmenu.diagcab
After downloading, you can just doubleclick on the file and it will start the troubleshooter.
In my case it corrected the tiles database
+++
You notice your start menu button is no longer responding
When you decide to do a restart or sign out you get:
Task Host Window
microsoft\windows\plug and play\device install reboot required
there is a temporary solution: log out as user, kill the Task host windows and log in again. Startmenu works again !
source
dinsdag 24 januari 2017
ASRock BIOS "Secure Flash check Fail" solved
Q1900TM-ITX
I wanted to upgrade the firmware from the existing 1.20 to 1.50 as offered by Asrock from their website.
I am running this board with 8GB RAM and Win10 Pro x64 and according to Asrock for Win10 users the firmware upgrade preference is to use Instant Flash or Internet Flash in the UEFI setup.
I tried both options and always failed with a popup box stating "Secure Flash Check Fail" message.
Together with asrock support I tried several options to get either Instant Flash or Internet Flash to work.
Both to no avail. Internet flash did not detect internet and always asked to check my internet settings
and instant flash always complained "Secure Flash check Fail"
Solution: all done within Win10
I went to the AMI Megatrends Website to get:
AMIBIOS_and_Aptio_AMI_Firmware_Update_Utility.zip
unpacked the file and went to
\AMI\AMIBIOS_and_Aptio_AMI_Firmware_Update_Utility\amiflash\Aptio\afuwin\64\afuwin64\AfuWin64 and started AFUWINGUI.EXE
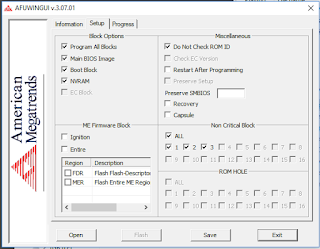
Flashed Asrock Bios from 1.20 to 1.50 using AMI Megatrends Aptio AFUWINGUI V.3.07.01 x64 with the following setup:
Tick the following boxes:
Program all Blocks
Main BIOS Image
Boot Block
NVRAM
Do not Check ROM ID
Bios 1.50 downloaded from Asrock site and renamed to Q1900TM150.ROM
After completion, shutdown PC
At next boot goto F2 Bios setup, F9 Load UEFI defaults, F10 Save and reboot again.
After that, get into updated BIOS using F2 and adjust to your liking.
Hope it helps
Abonneren op:
Reacties (Atom)


